

This post will explain how to install a pull out kitchen shelf. Standard Abram shows how to create simple access to items by constructing sliding cooking area shelves in a base cabinet. Take advantage of your kitchen area’s storage area by installing a pull-out rack in one or all of the base cabinets. The Shelf resembles a shallow drawer that slides out for easy access to products saved in the back of the Cabinet.
How To Install A Pull Out Kitchen Shelf & Cabinets
In this article, you can know about how to install a pull out kitchen shelf here are the details below;
Our rack was constructed for a standard 24-inch-deep by the 33-inch-wide base cabinet. However, its style is adaptable to practically any size cabinet. It has a 1×4 pine frames and 3/4-inch birch plywood bottom. If you’re only constructing one or two shelves, you can save some cash by going to a home main or lumberyard that sells quarter or half sheet’s of plywood. And in many cases, they’ll even cut the plywood to your measurements.
If you’ve never tried a woodworking job as apparently complex as this one, don’t worry. TOH Master Carpenter Norm Abram developed a simplified, straightforward style that can be quickly constructed with regular tools. Find out how to install sliding drawers in your kitchen cabinet listed below.
Wood Pull-Out Shelf Overview.
Illustration by Gregory Nemec.
With a pull out shelf, the shallow drawer on full extension slides removes the requirement to get down on your knees to choose through the back of the Cabinet in near darkness. Structure and setting up a retrofit pull-out rack is, in fact, an easy process, as This Old House master craftsman Norm Abram reveals here.
The sides of the drawers can simply be cut using a power miter saw or a backsaw in a miter box the end can be cut with an circular saw or perhaps precut at the lumberyard. The pieces collaborate with basic butt joints, which are glued and screwed. Finally, to simplify the ending up process, Norm uses a quick-drying, however hard, spray lacquer.
There are factory-mades wire baskets, trays, and other moving storage devices you can purchase. If you go this route, however, watch out for second-rate hardware– it can sag and drag under a load of pots and pans. No concerns if you construct the Shelf revealed here, though; its full-extension slides can supports over 100 pounds. Besides, nothing store-bought can ever competes with the finished appearance of a personalized wood shelf.
How you can Install Sliding Shelves In Kitchen Cabinets.
1. Measure the Cabinet.
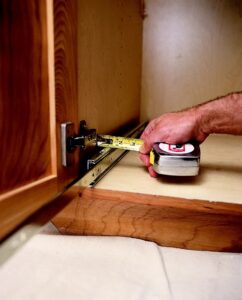
– To ensure that the rack can slides past the cabinet door and hinges, you will need to fur out the drawers slides with cleats.
– To determine how thick to make the cleats, open the cabinet door and place the drawer slide, with the inner rail extended, as near the door hinge as it can get without touching. Then measure the area in between the cabinet side and the back of the drawer slide.
– Rip the two 2-inch-high cleats from plywoods or 1x3s; they must be the same length as the drawer slides. You might need to develop the density you measured (above) with more than one piece of wood.
– Set the two cleats against the opposites sides of the Cabinet, measure between them, and then deduct 1 inch for the density of the drawer slides. The resulting measurement is the total width of the Shelf consisting of the pine frame. Set the cleats aside.
The general depth of the rack (front to back) is the same as the length of the drawer slides.
2. Develop the Drawer.
– Subtract 1 1/2 inches from the rack’s width and from its depth to identify the dimensions of the shelf bottom. Cut the bottom from 3/4- inch birch plywood, utilizing a circular saw.
– Next, utilizing a power or hand miter saw, cut the four 1x3s for the frame to length. The side pieces need to be the same length as the plywood bottom front to back; the front and backs pieces should be 1 1/2 inches long so they can cover the side pieces.
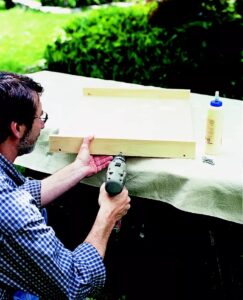
– Clamp the side section and back piece to the plywoods bottom; the bottom edges of the 1x3s and the plywood ought to be flush.
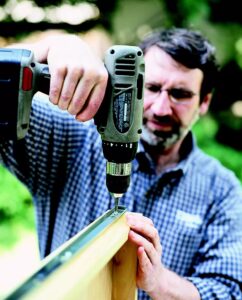
– Using a combination countersink bits, drill pilot holes for the screws through the 1x3s and in to the plywood every 8 to 10 inches. Likewise, drill two holes through each end of the back piece where it will overlap its side piece.
– Fasten the side pieces to the bottoms with glue and 15/8-inch drywall screws. Then glue and screws the back frame piece to the plywood bottom and into the attached sides.
3. Finish the Drawer Front.
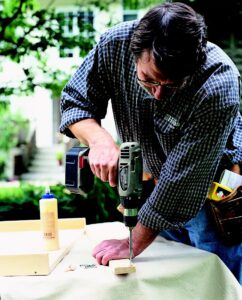
– Use a 1/2- inch-diameter spade bit to drill 1/4- inch-deep counterbore holes along the bottoms and at the ends of the front piece, using the same patterns as you did for the back pieces.
– Next, clamp the front to the put-together Shelf and, utilizing the countersink bit, drill pilot holes through counterbore holes and into the plywood and the 1×3 sides.
– Now, get rid of the clamp and glue, and screw the front to the sides and bottom utilizing 1 5/8- inch drywall screws.
4. Conceal the Screw Heads.
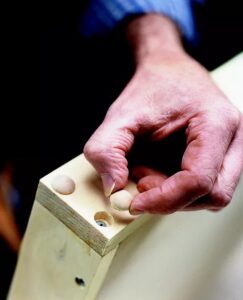
– To hide the screw heads along the front, glue 1/2- inch-diameter wood buttons into the counterbore holes.
Pointer: Use birch wood buttons to match the 1×3 pine; oak, cherry, and walnut buttons are also available.
5. Spray on a Lacquer FInish.
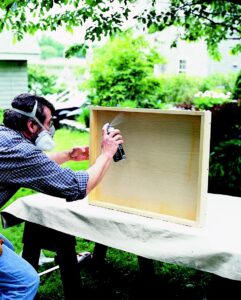
– Sand the put-together Shelf with 120-grit sandpaper.
– Use a tack cloths or damp rag to get rid of all the sanding dust.
– Move the Shelf outdoors for ending up. Place on safety glasses and a dual-cartridge respirator. Carefully use a thin coat of spray lacquer to the whole rack.
– Wait for the lacquer to dry– about 30 minutes– then lightly sand the Shelf with 180-grit sandpaper.
– Wipe off the sanding dust and applys a second lacquer coat.
Pointer: When spraying lacquer, keep a clean cotton cloth helpful for cleaning up any drips or runs.
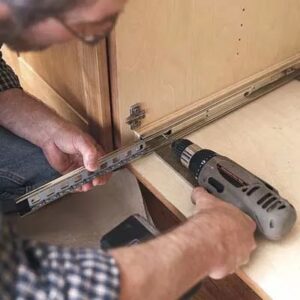
6. Mount the Slides to the Cabinet.
– Prepare the drawer slides for installation by very first eliminating the sliding-drawer-rail section from each slide.
– Cut two 1/8-inch-thick shims from an piece of Masonite or cardboards and lay them on the flooring of the Cabinet; the shims will raise the cleats and slides off the cabinets bottom enoughs to keep the Shelf from scraping.
– Place among the cleats that you cut from the overview on top of the shims and against the cabinet side. Fasten it to the Cabinet with 1 1/4- inch screws.
– Now, position the drawer slides on top of the shims and versus the cleat, and secure it to the cleat with the screws offered.
– Install the 2nd drawer slide on the opposite side of the Cabinet in the same manner.
Tip: In a lot of cases, it will be simpler to install the slides and the completed rack if you initially eliminate the cabinet doors.
7. Secure the Slides to the Shelf.
– Take among the sliding-rail sections you got rid of earlier from the drawer slide and set it versus the side of the pull-out Shelf.
– Align completion of the rail so that it’s flush with the front of the Shelf and slightly up from the bottom. (Every drawer slide is different; check out the maker’s directions to see exactly just how much area you should leave in between the rail and the shelf bottom.).
– Attach the rail to the Shelfs with the screws offered.
– Install the second rail on the opposing side of the rack.
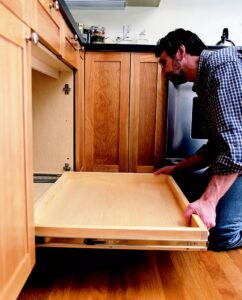
8. Install the Shelf.
– Remove the shims from beneaths the cleats and drawer slide, and purge them within the Cabinet.
– Push the drawer slides closed.
– Next, hold the Shelf simply outside of the Cabinet and level with the drawer slides.
– Align the sliding-rail areas on the Shelf with the drawer slides inside the Cabinet.
– Carefully but firmly push the rack all the way into the Cabinet.
– Pull the Shelfs all the way out to make certain that the moving rails have locked onto the drawer slides. If needed, get rid of the Shelf and reinstall it.